· 11 min read
Mac Mini ExternalMonitor Brightness:Building XBrightNo brightness control for your Mac mini external monitor? XBright, a free open-source menu bar app, sets the real backlight over DDC/CI. Here is how.
A Mac mini has no screen of its own, so it has no brightness slider either. Plug in a third-party monitor and the brightness keys do nothing; the only way to dim it is to reach behind the panel and dig through the on-screen menu. Mac mini external monitor brightness is a problem macOS simply does not solve. So I built XBright: a free, MIT-licensed menu bar app for Apple Silicon Macs that changes the monitor's real backlight over DDC/CI, the same thing the buttons on the monitor do. No overlay, no gamma tricks.
This post is the build log: how DDC/CI works on Apple Silicon, the timing rules that the spec imposes, how the app matches a monitor to a screen, and the limits I chose to keep. All code below is from the shipped source, which is 440 lines of Swift with no dependencies.
What XBright does
- One slider per external monitor, in the menu bar.
- The brightness keys (F1/F2) change the monitor under the mouse pointer, 5% per press.
- A command line:
XBright getandXBright set <0-100> [display-index]. - Requirements: an Apple Silicon Mac on macOS 14 or later, and a monitor with DDC/CI enabled in its own menu.
It went from the first commit to v1.0.0 on GitHub on the same day, built in one Claude Code session, and two point releases followed within a day. I tested it on a Mac mini M2 Pro with a Dell U2719D and a generic 1080p monitor. That is the full test matrix, and the README says so.
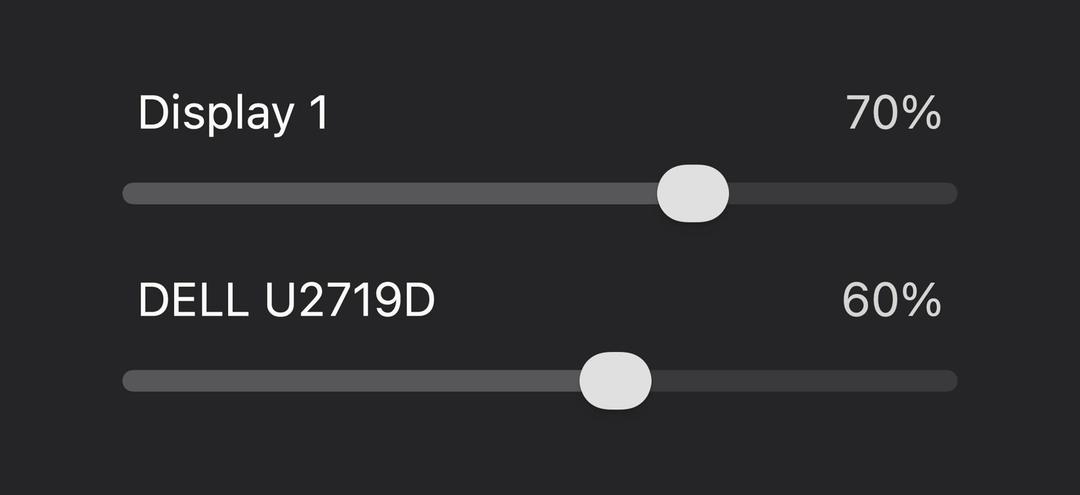
XBright's slider rows, rendered from the app's own slider view in the source: one row per monitor, named from the monitor's EDID when it has one.
Why a Mac mini can't change external monitor brightness
macOS controls the brightness of Apple displays because Apple ships the protocol on both sides. A Dell or LG monitor exposes its brightness through a different, older channel: DDC/CI (Display Data Channel Command Interface), a VESA standard that sends small I2C packets down the display cable to the monitor's controller. macOS does not use that channel for brightness, so the keys and the Control Center slider stay inactive for third-party monitors.
There are two ways to make a screen look darker:
| Approach | What changes | Trade-off |
|---|---|---|
| Software dimming (overlay or gamma) | The pixels the Mac sends | Backlight stays at full power; blacks and contrast get worse |
| DDC/CI | The monitor's own backlight setting | Needs a monitor and a cable path that pass DDC |
XBright does only the second one. That is a deliberate limit, covered at the end.
DDC/CI on Apple Silicon: IOAVService
On Intel Macs, apps reached the display's I2C bus through the framebuffer APIs. Apple Silicon
replaced that path. What works on M-series Macs is a private IOKit interface, IOAVService, which
exposes ReadI2C and WriteI2C calls on each display's DCPAVServiceProxy. Because it is private,
there is no header; Swift reaches the symbols with @_silgen_name:
swift
@_silgen_name("IOAVServiceCreateWithService")
private func IOAVServiceCreateWithService(_ allocator: CFAllocator?, _ service: io_service_t) -> Unmanaged<CFTypeRef>?
@_silgen_name("IOAVServiceReadI2C")
private func IOAVServiceReadI2C(_ service: CFTypeRef, _ chip: UInt32, _ offset: UInt32, _ buffer: UnsafeMutableRawPointer, _ size: UInt32) -> IOReturn
@_silgen_name("IOAVServiceWriteI2C")
private func IOAVServiceWriteI2C(_ service: CFTypeRef, _ chip: UInt32, _ address: UInt32, _ buffer: UnsafeMutableRawPointer, _ size: UInt32) -> IOReturn
Enumeration walks every DCPAVServiceProxy in the IORegistry and keeps the ones whose Location
property is External. A display only counts if a real brightness read succeeds, so a monitor with
DDC/CI switched off never shows up as a dead slider.
The packet: chip 0x37, VCP 0x10, XOR checksum
The DDC/CI spec treats the monitor as a fixed I2C device at address 0x6E/0x6F (7-bit 0x37),
and the host sends from source address 0x51. Brightness is VCP feature 0x10 in the Monitor
Control Command Set; it is the same code that ddcutil
reads with getvcp 10 on Linux. Every message ends with an XOR checksum over the address bytes and
the payload. Here is the write in full:
swift
static func write(_ service: CFTypeRef, percent: Int, maxValue: Int) {
    let value = Int((Double(percent) * Double(maxValue) / 100).rounded())
    var packet: [UInt8] = [0x84, 0x03, brightness, UInt8(value >> 8), UInt8(value & 0xff), 0]
    packet[5] = 0x6E ^ 0x51 ^ packet[0] ^ packet[1] ^ packet[2] ^ packet[3] ^ packet[4]
    // Sent twice: a single write is occasionally dropped by the monitor without an error.
    for _ in 0..<2 {
        _ = IOAVServiceWriteI2C(service, 0x37, 0x51, &packet, UInt32(packet.count))
        usleep(settle)
    }
}
0x84 is the length byte (0x80 plus four payload bytes), 0x03 is "Set VCP Feature", then the
feature code and the 16-bit value. The slider works in percent, but the monitor reports its own
maximum, so the value is scaled to that maximum before it goes on the wire.
The double write is the one line that looks like a mistake. It isn't. A monitor occasionally drops a single Set VCP write without returning an error, so the app cannot tell that it failed. The value is absolute, not a step, so sending it twice is the cheapest fix that cannot overshoot.
The 50 ms settle
The read side shows why the code sleeps so much:
swift
// DDC/CI timing: the monitor needs >= 40 ms before a reply is readable and 50 ms between commands.
private static let settle: useconds_t = 50_000
These numbers come from the VESA DDC/CI 1.1 spec: after a request the host should wait at least
40 ms before it reads the reply, and at least 50 ms before the next message to the display. One
50 ms constant covers both. The read loop makes up to four attempts, and it accepts a reply only
when the checksum (computed from the 0x50 virtual host address, as the spec defines) matches, the
opcode is a VCP reply, the result code is zero, the feature is 0x10, and the maximum is above
zero.
Matching a DDC device to an NSScreen
The I2C side and the AppKit side know about the same monitor in two different ways. IOAVService
gives you a bus; NSScreen gives you a CGDirectDisplayID. To make F1/F2 change "the monitor under
the pointer", the app has to join them.
The join key is the monitor's EDID, read over the same bus at address 0x50. The code checks the
8-byte EDID header (00 FF FF FF FF FF FF 00), then reads the vendor ID (bytes 8–9, big-endian),
the product code (bytes 10–11, little-endian), and the serial (bytes 12–15, little-endian). It
compares them with CGDisplayVendorNumber, CGDisplayModelNumber and CGDisplaySerialNumber:
swift
let exact = free.firstIndex {
    CGDisplayVendorNumber($0.id) == ddc.vendor && CGDisplayModelNumber($0.id) == ddc.product && CGDisplaySerialNumber($0.id) == ddc.serial
}
let loose = free.firstIndex {
    CGDisplayVendorNumber($0.id) == ddc.vendor && CGDisplayModelNumber($0.id) == ddc.product
}
let screen = (exact ?? loose).map { free.remove(at: $0) }
An exact match wins; a vendor-plus-model match is the fallback for monitors that report a zero
serial. Each matched screen is removed from the pool, so two identical monitors cannot both claim
the same screen. The slider label comes from the EDID's monitor-name descriptor (tag 0xFC), then
from NSScreen.localizedName. The v1.0.2 release adds a third fallback, a numbered name, for the
case where macOS reports an empty display name. That is the "Display 1" row in the image above.
The app also re-scans when the screen layout changes or the Mac wakes, but it waits three seconds first, because a monitor ignores DDC for a moment after hot-plug or wake.
Coalescing writes on a serial queue
A slider drag fires dozens of change events per second. Every DDC write costs two 50 ms waits, so
writing each value would queue up seconds of stale commands and the backlight would trail the mouse.
Display.swift keeps only the latest value:
swift
func set(_ value: Int) {
    percent = min(100, max(0, value))
    pending = percent
    if !writing { drain() }
}

private func drain() {
    guard let value = pending else {
        writing = false
        return
    }
    pending = nil
    writing = true
    let service = self.service
    let maxValue = self.maxValue
    DDC.queue.async {
        DDC.write(service, percent: value, maxValue: maxValue)
        DispatchQueue.main.async { self.drain() }
    }
}
At most one write is in flight per monitor. When it finishes, the drain picks up whatever the user
last asked for and skips everything in between. All DDC traffic, reads included, goes through one
serial DispatchQueue, so a menu-open re-scan can never interleave packets with a write in
progress.
Brightness keys and the Accessibility prompt
On a Mac keyboard, F1/F2 send system-defined media-key events, not ordinary key presses. To
catch them, XBright installs a Quartz event tap with
CGEvent.tapCreate at the session level and filters for NX_SYSDEFINED events with the
brightness-up and brightness-down key codes. Swift does not import those IOKit constants, so they
are declared by hand with a comment that names the originals.
Apple's tapCreate documentation
states the rule: an event tap receives key events only when the process runs as root or has access
for assistive devices. That is why the brightness keys are opt-in behind a menu item that triggers
the Accessibility prompt, while the slider and the command line work without any permission. The tap
also handles tapDisabledByTimeout and tapDisabledByUserInput by switching itself back on, and it
only swallows the key when there is a DDC monitor to act on, so the keys still work normally when
nothing matches.
Building without Xcode
There is no Xcode project. build.sh compiles the six source files with swiftc, copies an
Info.plist with LSUIElement set (menu bar only, no Dock icon), and signs the bundle ad hoc:
sh
swiftc -O -swift-version 5 -target arm64-apple-macos14.0 Sources/*.swift -o "$APP/Contents/MacOS/XBright"
cp Info.plist "$APP/Contents/Info.plist"
codesign --force --options runtime --sign - "$APP"
The same binary is also the command line tool: with arguments it runs get or set and exits;
without them it starts the menu bar app.
Ad-hoc signing has two costs that the README states up front. The build is not notarized, so macOS blocks the first launch until you clear the quarantine flag:
sh
xattr -dr com.apple.quarantine /Applications/XBright.app
And macOS treats each new ad-hoc build as a different app, so it asks for Accessibility access again after an update.
Small tools like this are a change of scale from my usual work, which is award-winning websites in GSAP, WebGL and Next.js, and you can see that in my selected work. The habit is the same: probe the real hardware before building any UI. If your team needs that kind of rigour on a site build, here is how I work with studios and founders.
The limits I kept
- No software dimming fallback. A monitor without DDC/CI gets no slider; the slider only ever means the real backlight.
- No on-screen indicator when a brightness key is pressed.
- Apple displays are not handled. macOS already controls the Studio Display and Pro Display XDR.
- Apple Silicon only. Intel Macs use a different I2C path.
- Some HDMI ports don't pass DDC. The built-in HDMI port on some Macs (M1, base M2) does not carry DDC, so use USB-C or DisplayPort for those.
- Tested on one setup. Mac mini M2 Pro, Dell U2719D, one generic 1080p monitor.
If you need contrast and volume control or software dimming, MonitorControl is the established free, open-source app and lists all of those features. XBright is the small version: one job, readable in an afternoon.
FAQ
How do I control external monitor brightness on a Mac mini?
Use an app that speaks DDC/CI, enable DDC/CI in the monitor's own menu, and connect over USB-C, DisplayPort or a supported HDMI port. XBright gives you a menu bar slider, the F1/F2 keys and a command line on Apple Silicon Macs.
Why do the brightness keys not work on my external monitor?
macOS sends brightness changes only to displays it controls natively, such as Apple displays. A third-party monitor needs DDC/CI commands, which macOS does not send for brightness on its own.
Does DDC/CI work over HDMI on Apple Silicon?
It depends on the port. USB-C and DisplayPort connections pass DDC; the built-in HDMI port on some Macs, including the M1 and base M2 models, does not.
Is XBright safe to run if it isn't notarized?
The full source is public and builds with one script, so you can read every line and build it yourself instead of downloading the release. The release build is ad-hoc signed, so you clear the quarantine flag once. Since v1.0.3 it is signed with the hardened runtime, so macOS refuses to load another process's library into it.
Can I script monitor brightness from the terminal?
Yes. XBright get prints each monitor's index, brightness and name, and
XBright set 60 sets every monitor, or one monitor if you add its index.
Get XBright
The source, the build script and the releases are on GitHub: github.com/devhontran/xbright. It is free and MIT licensed. Issues with a monitor model that doesn't respond are welcome; DDC behaviour varies a lot between panels.
If it saves you a reach for the monitor buttons, you can buy me a coffee.
And if you are planning a website that needs the same care with real devices, motion and performance, start a project with me.
04 — Engineering note
For agencies, studios and brands
Need this levelof execution?
05 — Related notes
Same tags · same craft
Continue the thread.
- 01ffmpeg Loses HEVC Alpha: Transparent Video FixEngineering note / 077 · 01 Sep 26Transparent HEVC .mov comes out of ffmpeg with a baked-in background? ffmpeg silently drops Apple's alpha layer. The ProRes 4444 pipeline that fixes it.10 min
- 02ffmpeg "Operation Not Permitted" on macOS: The Real FixLab note / 036 · 09 Jul 26Get "Operation not permitted" running ffmpeg on a file in Downloads on macOS? It's TCC blocking your terminal app, not a broken install — here's the real fix.8 min
- 03Immersive Website With a CMS Your Team Can EditEngineering note / 091 · 16 Nov 26Want an immersive, interactive 3D website AND a CMS your team runs on Monday? It's one build, not two. How an award-winning developer ships the wow without the black box.9 min